


There’s no shortage of advanced growing methods aimed at maximising your yield and one of the most effective is mainlining. This advanced technique can transform your plant into a powerhouse of production. While it takes a bit of time and skill, the rewards are more than worth it.
At its core, mainlining is an advanced growing technique aimed at maximising the yield of a single plant. This is an incredibly high-stress process that will increase the time needed to flower a plant by anywhere from 6-8 weeks depending on just how far you want to go with it. But what exactly is it, how does it work, and why do growers do it?
What is mainlining and why do growers use it?
Before diving into all the dirty details, it’s important to get a few bits of terminology straight; namely mainlining and manifold.
Mainlining is the practice of repeatedly topping a cannabis plant to create additional stalks allowing for multiple large, dense colas. A manifold is the plant’s structure created to accomplish this. Basically, you use topping and training to create a manifold to mainline your plant. That’s a little complicated right now, but it’ll all make sense soon.
The core concept of mainlining cannabis is to create a manifold where each of the branches is equally far from the roots. This effectively removes a plant’s ability to grow lateral branches and turns each grow site into an apical cola allowing for greatly increased yields.
If all of that sounds complicated, check out our in-depth guides on topping and low-stress training to learn the basics before diving into the deep end.
Related post
Pros and cons of mainlining
Before taking a deep dive into the “how”, it’s important to first understand the “why”. Mainlining is slow, complicated, a little risky, and not advised for novice growers. So, why on Earth do growers swear by it?

Advantages of mainlining
- By growing more colas, you can massively increase your harvest
- Fewer lateral branches allow for superior light penetration and airflow
- Massively increased control over the shape and size of your plant
- Can be scaled up or down to fit your grow space
Disadvantages of mainlining
- It takes significantly longer
- It requires much more labour and attention
- Not recommended for inexperienced growers
- A greatly reduced plant count as a mainlined plant needs more space
Now, if that sounds like a worthwhile trade, then mainlining your next cannabis plant might be a good idea. Ready to put your green thumb to the test?
Related post
Preparing for mainlining a cannabis plant
An ounce of prevention is worth a pound of cure, as they say, and that’s absolutely true here. By taking a little extra time to get yourself set up properly, you can make the entire process easier, smoother, and safer.
What do I need for mainlining?
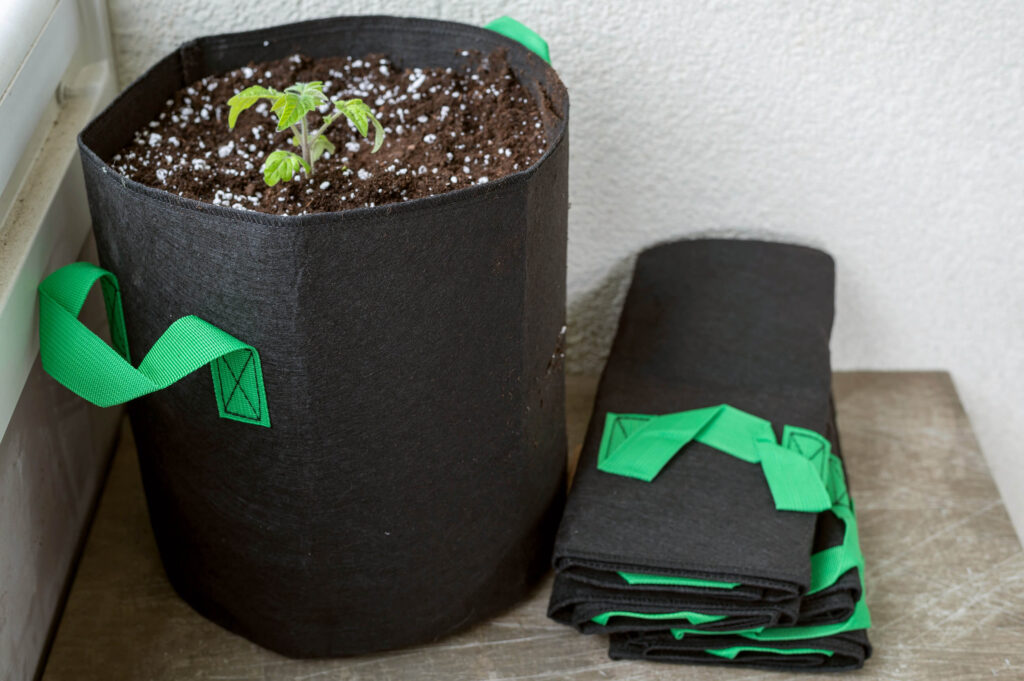
Aside from the normal equipment needed for growing cannabis, mainlining will require a few other tools. Fortunately, none of them are hard to come by. The most important extra equipment you’ll need are flexible garden ties and a special training pot.
Mainlining pots are typically made of cloth and have holes spaced around the upper rim. These are where you’ll be tying your branches down but more on that below. Note that any fabric pot will work. If there aren’t holes already, simply make some. Creating 8 small holes around the rim should be more than enough.
How much space does mainlining require?
This is always a tricky question as strains can vary wildly but there are a few guidelines that growers can use. Generally, a mainlined plant will require far more horizontal space than vertical as each new stalk spreads away from the centre.
If a typical plant from a given strain requires 50×50 cm, then a mainlined plant of that same strain should need about 3-4 times that area; about 100×100 cm.
What strains are a good choice for mainlining?
Picking the right strain for mainlining will have a huge impact on the ease of your grow. While any (non-autoflowering) strain can be used, some are going to be better than others. Things to consider when picking a strain for mainlining include growth pattern, height, and resilience.
You want a strain that has relatively short internodal spacing, symmetrical growth, and robust branches. Additionally, as this technique revolves around growing a plant outwards instead of upwards, you want a strain that grows relatively tall. Plants that are too short will take too long to properly develop a manifold. Lastly, you need a strain that is incredibly robust as mainlining is one of the most stressful things a grower can do to a plant.
White Diesel, Northern Lights, and Girl Scout Cookies all make excellent choices for mainlining.
Can an autoflowering plant be mainlined?
Put simply, no. Since mainlining requires so much extra time spent in the vegetative phase, autoflowering plants are not suitable as they will simply start flowering on their own well before you’ve properly developed a manifold.
Related post
Getting started and mainlining in the vegetative phase
OK, with all of that out of the way, how does a grower actually mainline a plant? Well, it all starts with a simple cut.
First topping
Once your cannabis plant has begun growing true leaves, it’s time to start thinking about topping. While it’s possible to do this between the first and second nodes, it’s hardly ideal. Topping a plant is incredibly stressful and doing it too soon can cause too much shock and could permanently damage (or even kill in the worst-case scenario) your plant.
Instead, wait a week or so until the plant has sprouted its fifth set of true leaves as this will make sure that there are more than enough roots to support the coming growth. Once these fifth leaves are growing, it’s time to make the first cut.
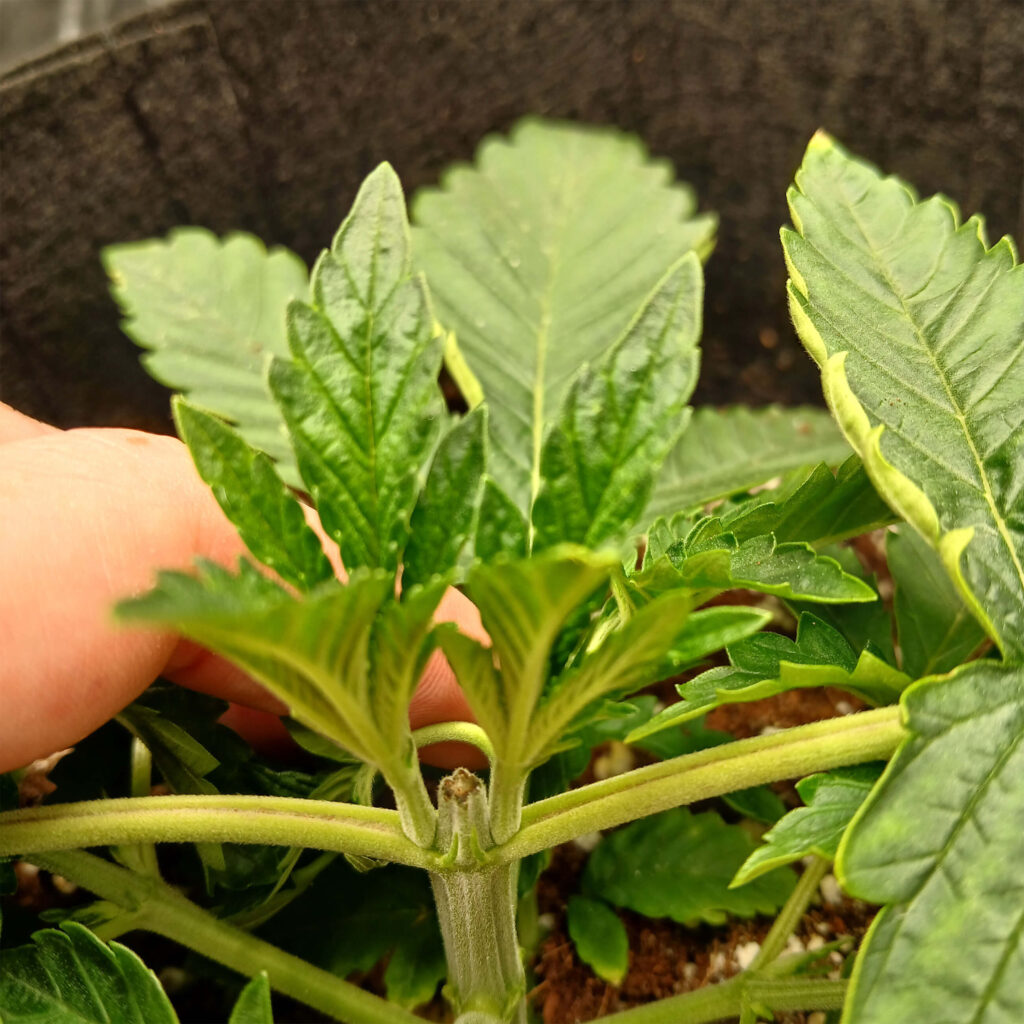
For mainlining, the ideal place to top your plant is between the third and fourth inner nodes. Ideally, you want to cut as close to the third set of leaves as possible, but it’s vital that you leave at least a small bit of stem (<1 cm). At this stage of growth, your plant should have started to develop lateral branches and the two small nubs of growth above the third set of leaves will turn into the first part of your manifold.
Give your plant a couple of days to recover from this stress. Once you begin to see any new growth, it’s time for the first pruning. You’ll want to remove any vegetation below the third fan leaves (leave this third set of leaves). You should be left with a small main stalk sporting two fan leaves growing off in opposite directions and two very small nubs of new growth above them.
Second topping
After the first round of topping and pruning, you’ll need to give your plant ample time to recover. Exactly how long will vary from plant to plant, but 10-20 days is standard. Over the next week or two, you’ll notice your plant going through its first major structural changes.
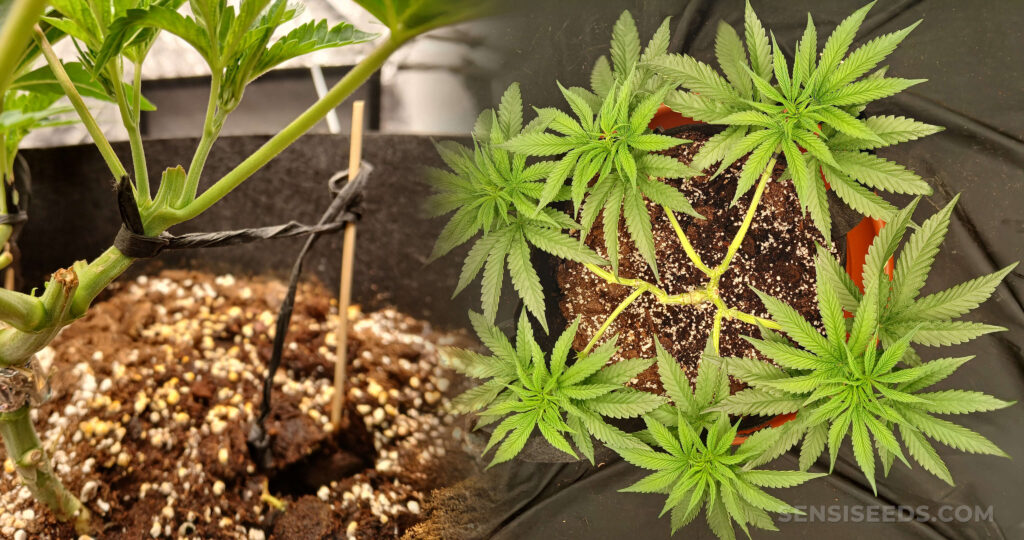
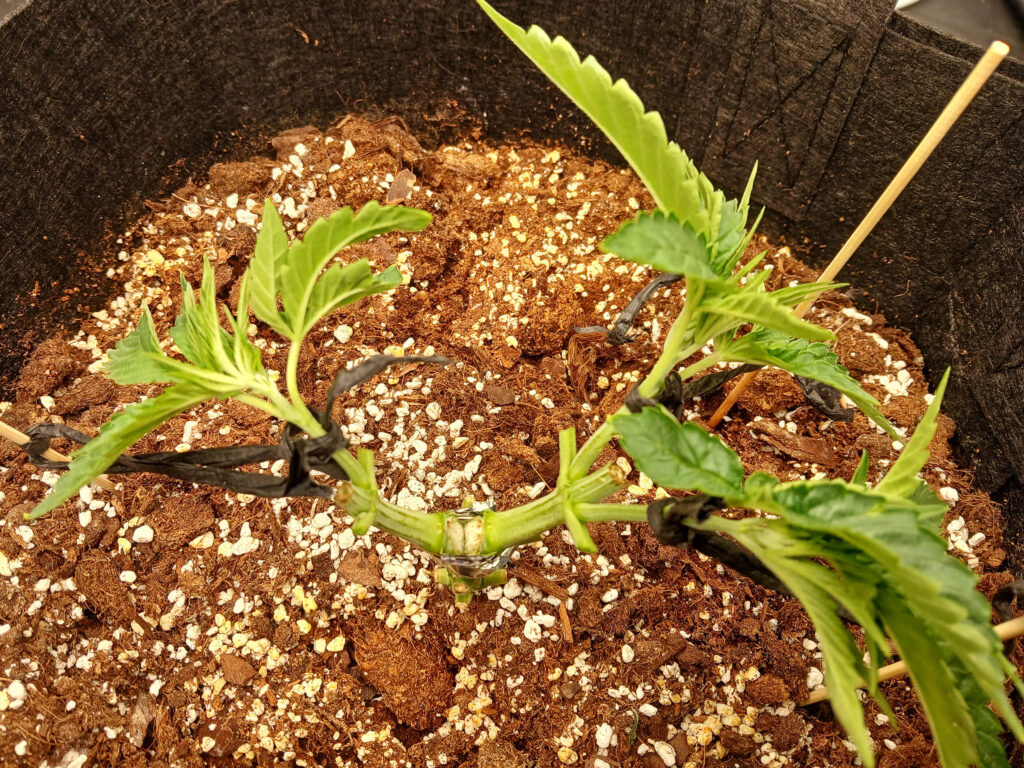
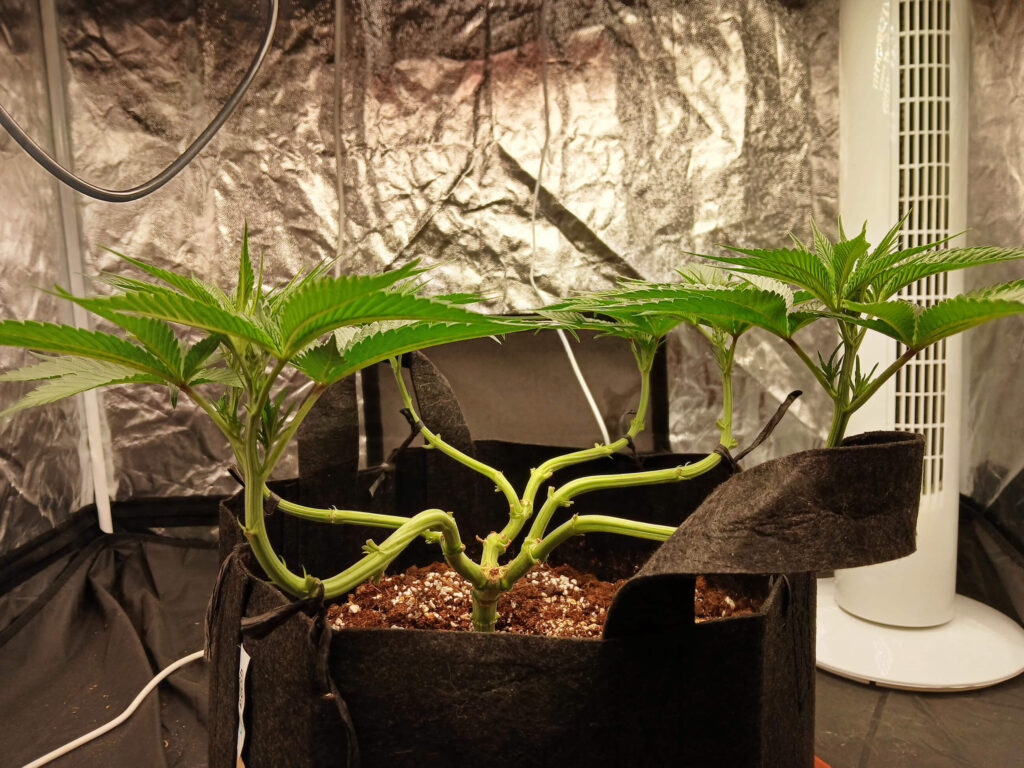
Those little nubs left over from the first topping will develop into new main stalks that each grow new leaves. As these begin to grow, take those garden ties and very gently tie them down to the holes in your pot.
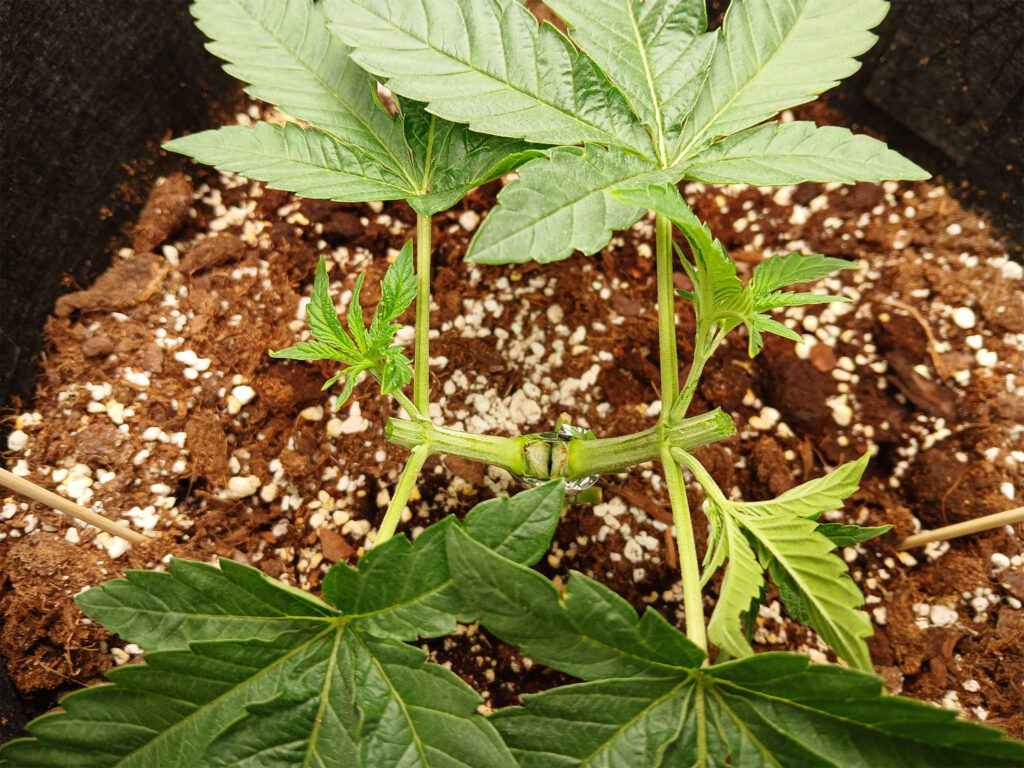
Once again, patience is key. Wait until these new stalks have grown three to five new nodes before giving the plant its second topping. This time, though, you’ll be trimming just above the first node; again leaving the leaves and a small amount of stem.
If you’re trimming at the first node, why wait until the plant has grown three to five? Again, it has to do with the stress caused by topping. In a few days, your plant will begin to develop significant new growth and you want to make sure that it has the roots to support it.
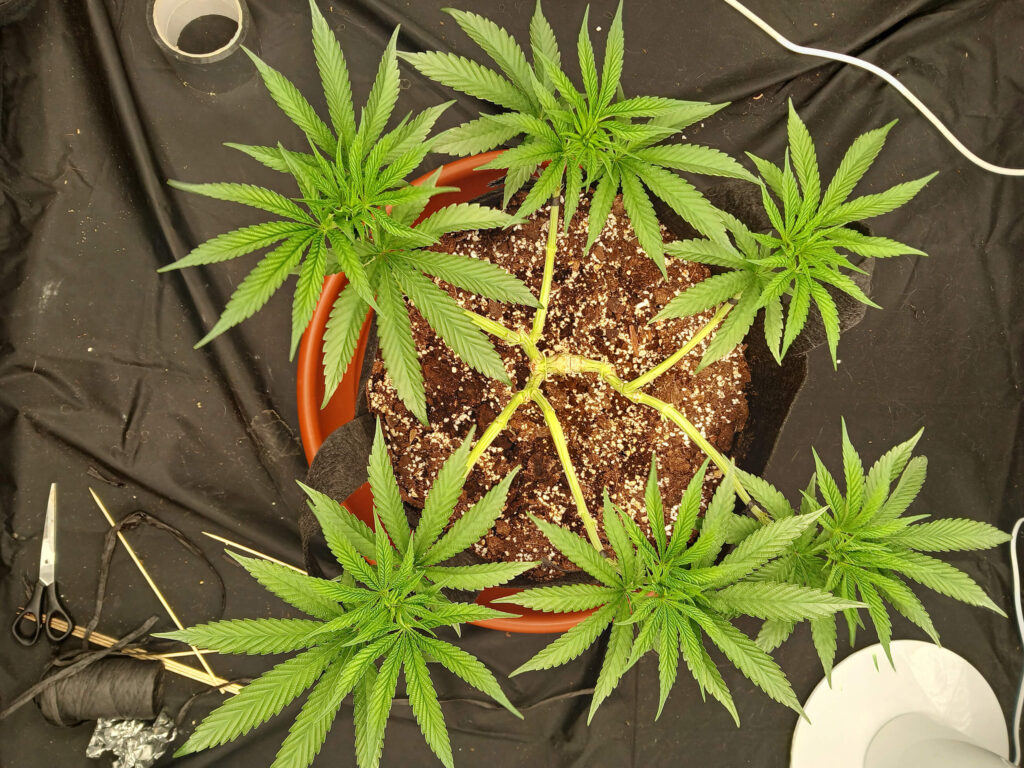
After a few days, the two stalks you had should have each split into two new stalks giving you a total of four that are all equally spaced from the centre of your plant. As these branches grow, you’ll want to tie them down as well to encourage your plant to grow out instead of up.
Final topping

Again, you’ll need to be patient as your plant recovers from the second topping. Let your plant grow a bit more than last time until these four stems are about 10 cm long. Once they’re long enough, it’s time for yet another topping. By this point, you should know the drill. Trim the branch above either the first or third inner node (it depends on the plant’s size at this point and your desired final size).
After a few more days, you should now have eight equal branches that are tied to each of the eight holes in your pot. Theoretically, there’s no limit to how many times you can repeat this process, though going from eight to 16 is a significant jump and you’ll need to have a rather large pot and ample space.
Pruning and training
Roughly 10-15 days after the final topping (this should be close to six weeks after planting), it’s time to prepare your plant for the transition to flowering. It’s important to remove all growth below the point where you topped your plant (though you should wait a few days between topping and pruning). It’s also necessary that you properly train your plants. If you don’t tie the stems down during the vegetation and early flowering stages, then your plant will grow into a towering tangle of competing branches.
Related post
The flowering phase
By now, you should have eight tied-down main stalks all an equal distance from the centre of the plant. All of the hard work is done and now you can flower your plant normally; all you need to do is switch to a 12/12 light schedule and swap to flowering nutrients.
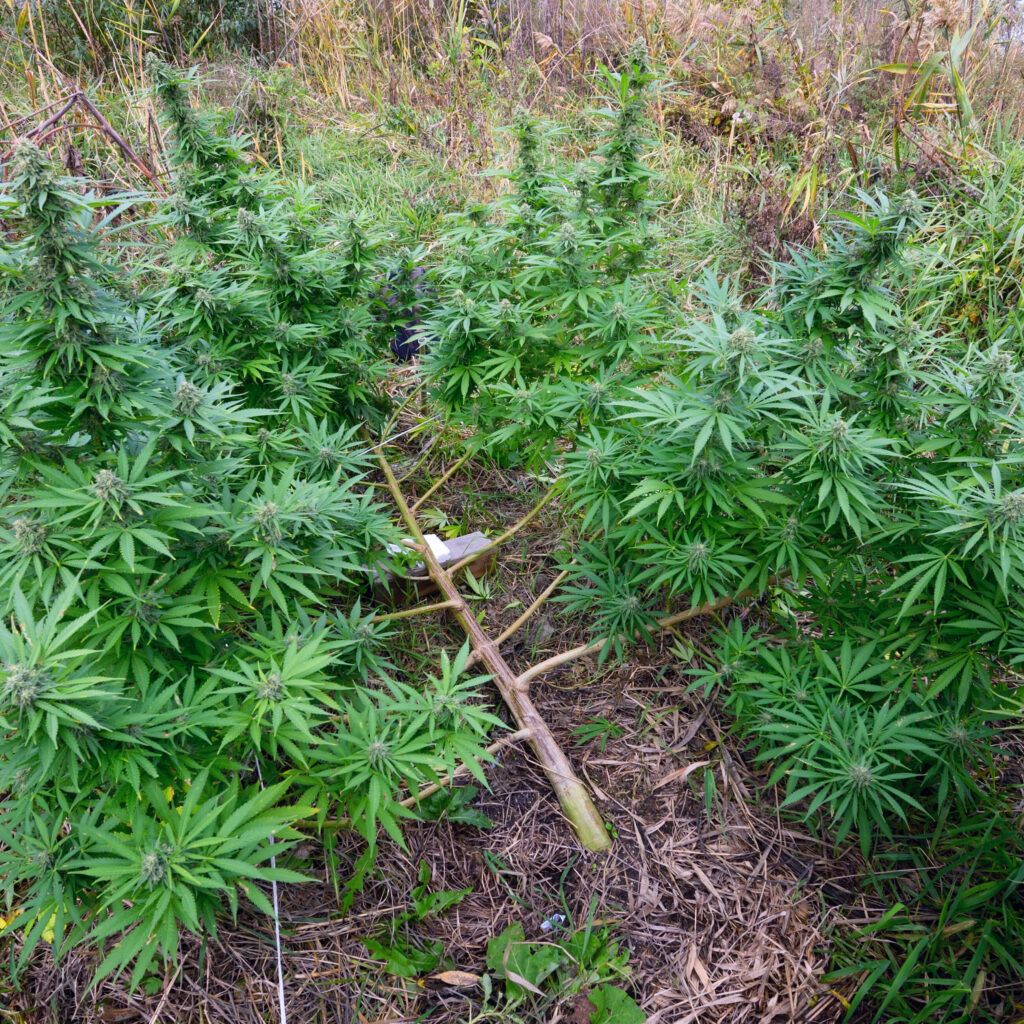
Over the next two to three weeks, you’ll likely notice an explosion of vertical growth as the plant stretches. It’s not uncommon for plants to double (or even triple) in height during this period, so make sure that you start flowering well before you might think you need to. Fortunately, thanks to all of the topping and training that you’ve done stretch shouldn’t be too much of an issue for a properly mainlined plant. Throughout the flowering phase, continued training and pruning is essential.
As your plant progresses through the stages of flowering, you’ll begin to see buds pop up all along each of these main stems. Unlike a more “traditionally” grown plant, these won’t be small single buds but instead, each bud will develop into a massive cola along the entire length of each of your eight stems.
Mainlining best practices and tips

If you’re interested in trying your hand at mainlining, there are a few other random bits of advice that you should keep in mind.
- First, and most importantly, only mainline healthy plants. It’s impossible to overstate just how traumatic mainlining is for a cannabis plant and trying this technique on a plant that isn’t in perfect health could spell disaster. Even if your plant takes 3 full weeks to recover from being topped, give it all the time it needs. This is not the kind of thing that can be rushed.
- Additionally, keep your plant trimmed. Keeping your plant pruned will allow for every flowering site to receive maximum light and airflow and allow your plant to reach its full potential. Never forget that you should prune any unnecessary fan leaves before flowering. When it comes to mainlining, symmetry is key. You should be checking on your plants daily and making sure that they are tied down, evenly spaced, and at a uniform height.
- While clones can be mainlined, they tend to have a somewhat irregular growth pattern which makes them far more complicated than seeds. If mainlining is your goal, go the extra mile and get some seeds even if you have ample access to quality clones.
- Lastly, it’s important to keep a gentle hand at all times. Cannabis plants are incredibly resilient, but they aren’t invincible. When you’re tying your branches down, don’t go too tight as this can restrict or potentially kill off a branch. Likewise, don’t tie your branches down too far. If you feel resistance, stop pulling.
Get the most out of your plants
Mainlining is a fairly complicated way to grow a plant, but it’s hardly impossible. By following the steps outlined here, you can successfully push your per-plant harvest to unseen levels. Mainlining may not be a viable technique for every grower but those with the patience, dedication, and attention to detail will find it to be one of the most rewarding methods out there.
Have you tried it? Describe the experience and share tips in the comments!
- Disclaimer:Laws and regulations regarding cannabis cultivation differ from country to country. Sensi Seeds therefore strongly advises you to check your local laws and regulations. Do not act in conflict with the law.

Mainlining is a truly remarkable technique if applied right
Valeu, muito obrigado!